Many new RVs are sold as "inverter prepped" or "inverter ready." It means the factory added wiring so you can install an inverter later and power some of your outlets from your batteries. It does not mean an inverter is included, and it does not mean any inverter will work.
This guide covers what the prep is, how to tell if you have it, how to pick an inverter that fits it, and the wiring mistakes that cause dead batteries and melted wires.
What an Inverter Does in an RV
Your RV batteries store 12V DC power. Your outlets, TV and coffee maker run on 120V AC. An inverter turns battery power into 120V AC, so you can use those outlets when you aren't plugged in or running a generator.
An inverter/charger does that job and also charges your batteries when you're on shore power or a generator. For most RVs, an inverter/charger is the better choice. We explain why below.
What Is Inverter Prep?
Inverter prep is usually an extra loop of wire in the RV's 120V system. The loop runs between a circuit breaker in your panel and the outlets that breaker feeds. The factory leaves the loop in a junction box, often in a pass-through storage bay or near the batteries. That spot gives the installer easy access to both the AC wiring and the battery.
To install an inverter, the installer opens the box and splits the loop:
- The side coming from the breaker goes to the inverter's AC input.
- The side going to the outlets connects to the inverter's AC output.
When you're plugged in, shore power passes through the inverter to those outlets. When you're not, the inverter powers them from your batteries.
Most preps cover only a few outlets, sometimes plus the TV or a residential fridge. They rarely cover the A/C, the microwave or the water heater. They should never include the converter (more on that below). Check your owner's manual or ask the dealer which outlets are on the prepped circuit before you buy anything.
How to Tell If Your RV Is Inverter Prepped
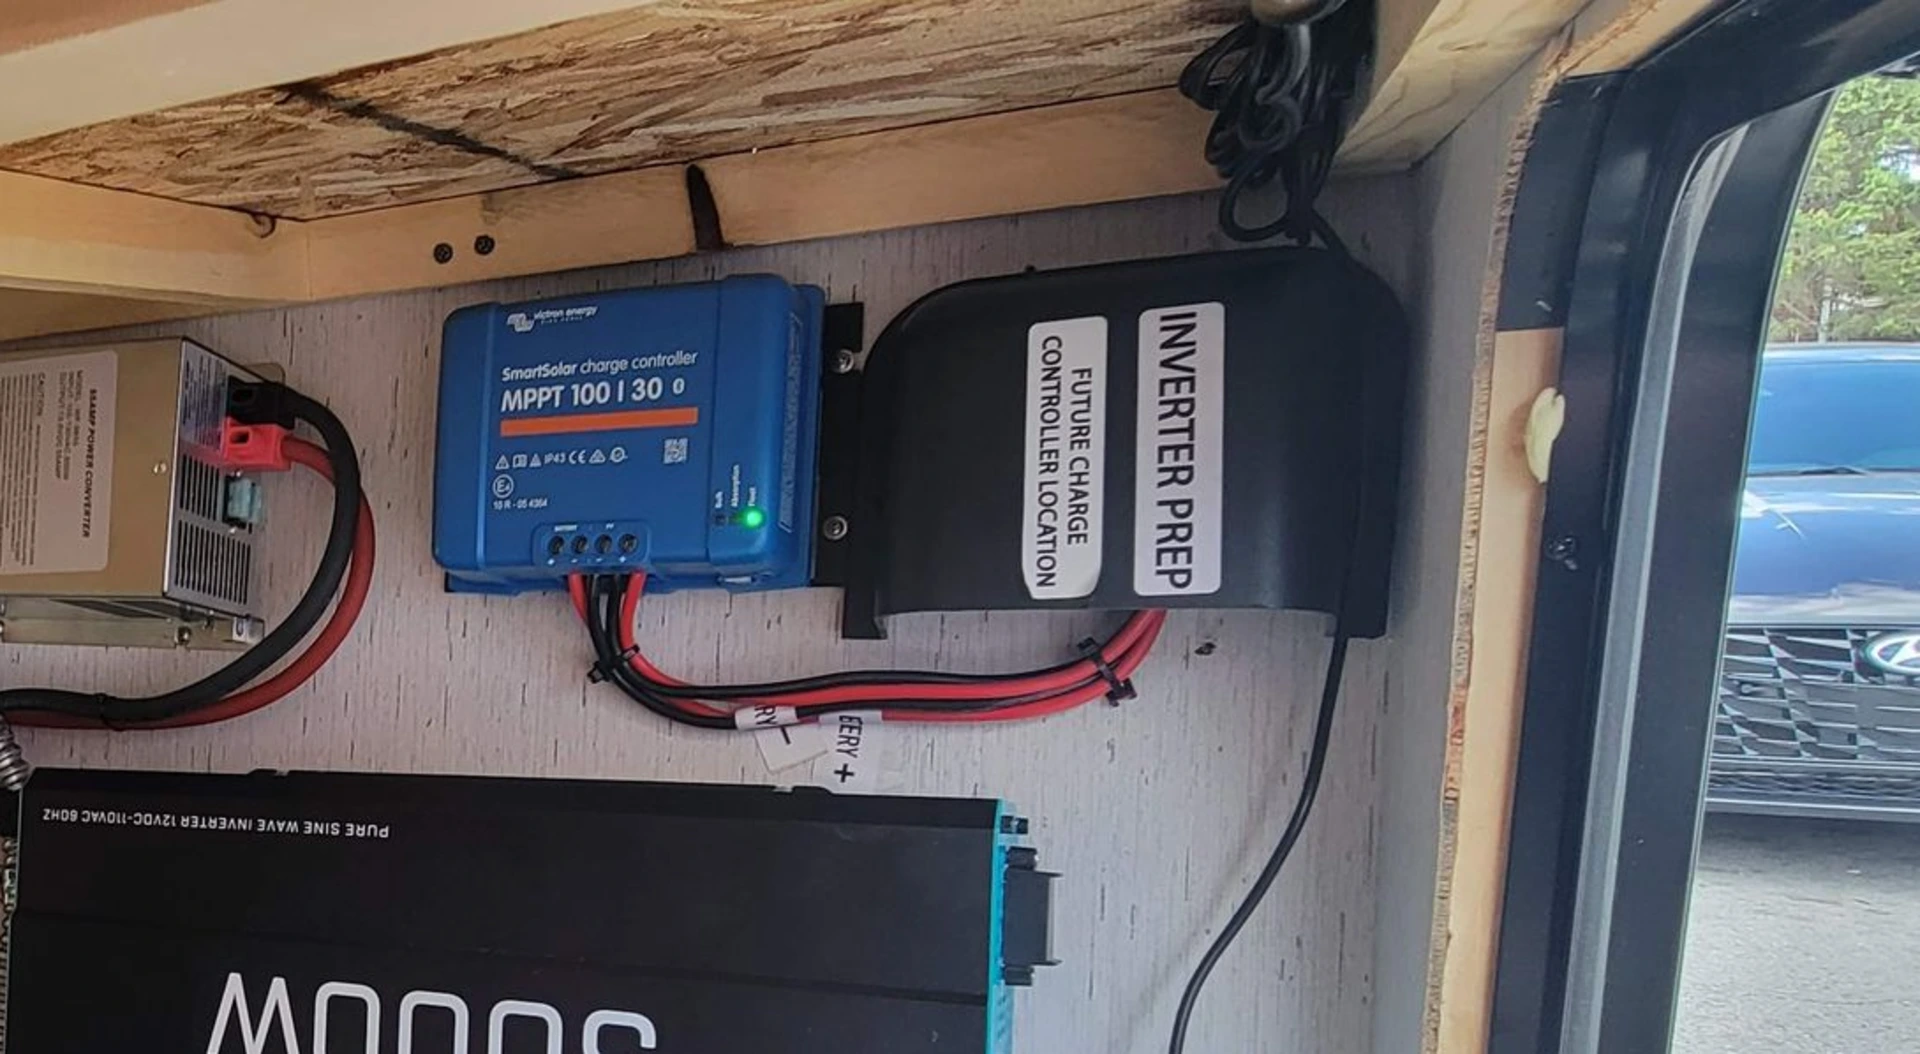
A factory inverter prep cover in the pass-through bay of a travel trailer.
Look for these signs:
- A labeled cover or junction box. It's usually in a pass-through bay or near the battery compartment and is marked "inverter prep" or similar.
- A breaker labeled "inverter" in your 120V panel.
- A line in the spec sheet or owner's manual. Grand Design, Keystone, Jayco and other brands offer inverter prep on many models. Where it sits and what it powers can change from one model or year to the next.
If you can't find it, ask the dealer or send us your year, make and model.
Inverter prep and solar prep are different things. Solar prep is wiring for roof panels and a charge controller. Inverter prep is wiring for 120V outlets. Many RVs have both. To learn what your solar prep includes, see What Does Solar Prep Mean on an RV?
Which Inverter Should I Buy for an Inverter-Prepped RV?
Three things decide what fits: a transfer switch, the size of the prepped circuit, and your batteries.
1. Get a Transfer Switch, Ideally an Inverter/Charger
A transfer switch lets the inverter pass shore or generator power through to the outlets when it's available, then switch to battery power when it isn't. Without one, those outlets can only ever get power from the inverter, even when you're plugged in.
That causes a problem people don't expect: you can drain your batteries while you're plugged into shore power.
Here's how it happens. Say your RV has a 700W converter charging the batteries and a 2000W inverter with no transfer switch. You're plugged in and run a 1000W coffee maker on an inverted outlet:
- The inverter pulls about 1000W from the batteries, plus some loss.
- The converter only puts about 700W back in.
- The batteries lose the difference the whole time that load runs.
Run it long enough and the batteries go flat while you're "plugged in."
An inverter/charger with a built-in transfer switch fixes this. On shore power, the outlets run straight from the pedestal, and the charger tops off your batteries.
Victron inverter/chargers bring two more benefits:
- Faster charging. The built-in charger is usually much stronger than the converter your RV came with. The MultiPlus 12/2000 has an 80A charger, and the MultiPlus-II 12/3000 has a 120A charger. The newer MultiPlus-II 12/4000 has a 160A charger. That means shorter generator runs and faster recharges at the campground.
- Works with any common 12V battery. The charger can be set for flooded lead-acid, AGM, gel or lithium (LiFePO4). You can install it with your current batteries and switch to lithium later without replacing the inverter.
The converter must never be on the inverted circuit. If the converter is fed from an inverter-powered outlet, the inverter powers the converter, which charges the same batteries the inverter is draining. That loop wastes power and kills batteries. The converter needs to stay on a circuit fed directly from shore power, or be replaced by the inverter/charger's own charger.
2. Match the Inverter to the Prepped Circuit
The common advice is to stay at 2000W or less. The real limit is the wire and breaker on your prepped circuit.
How to check yours:
- Breaker: the amp rating is printed on the breaker handle in your 120V panel.
- Wire: the gauge is printed on the wire jacket. If the RV uses Romex-style cable, the jacket color tells you: white is 14 gauge, yellow is 12 gauge and orange is 10 gauge.
| Prepped circuit | About how many watts it can safely carry | Inverter/charger we recommend |
|---|---|---|
| 15A breaker, 14 gauge wire | 1,800W | MultiPlus 12/2000/80-50, 120V, or the MultiPlus 12/1200/50-16, 120V for light loads and smaller batteries |
| 20A breaker, 12 gauge wire | 2,400W | MultiPlus 12/2000/80-50, 120V, or the MultiPlus-II 12/3000/120-50, 120V with a 20A output breaker |
The MultiPlus 12/2000 is UL 458 listed for RV use, which makes it a natural fit for factory preps. For a single prepped circuit, choose the 120V version of any model, not the 2x120V version. The 2x120V units are built for whole-coach installs in 50 amp RVs, covered below.
Why this matters more than people think: once the inverter is in the loop, the panel breaker sits upstream of the inverter. It protects the wire when shore power passes through. It does not protect the wire when the inverter is powering the outlets from your batteries. A 3000W inverter can push about 25A into a 14 gauge wire rated for 15A, and nothing will trip. That's how wires overheat.
So you have two options:
- Pick an inverter whose output can't exceed what the wire can carry.
- Add a breaker on the inverter's output that matches the wire.
We do both on our installs.
3. Size the Battery and DC Wiring for the Load
The AC side gets the attention, but the DC side is where most DIY installs go wrong. A 2000W inverter running at full load can pull close to 200A from a 12V battery. That needs:
- Heavy cable. Usually 2/0 gauge for a 2000W inverter, kept as short as possible.
- A fuse at the battery sized for the inverter and the cable. For a lithium bank larger than 100Ah, use a Class T fuse. Big lithium banks can deliver enough short-circuit current to defeat ordinary fuses. For larger systems, a Lynx Class-T Power In keeps the Class T fuse and busbar in one clean unit.
- A battery that can deliver the current. Most stock lead-acid RV batteries can't run a 2000W load for long. Lithium handles high loads much better. Check the battery's continuous discharge rating against the inverter. We recommend and install Epoch lithium batteries; contact us for pricing, since we don't sell them online yet. Victron options in our shop include the Victron Lithium SuperPack NG 12.8V 100Ah, the SuperPack NG 12.8V 200Ah and the Smart LiFePO4 12.8V 200Ah.
A VE.Bus Smart Dongle adds Bluetooth monitoring to a MultiPlus, so you can see battery state and loads on your phone.
Recharging: The Inverter Is Only Half the System
An inverter spends battery power. Something has to put it back:
- Shore power or a generator, through the inverter/charger's charger.
- Solar, which charges while you camp without any noise or fuel. New to solar? Start with Basics of RV Solar. To add solar to your current setup, see solar-only upgrades.
- Your tow vehicle or engine, through a DC-DC charger.
Two Ways to Add an Inverter
Option 1: Use the Factory Inverter Prep
This is the simplest install. An inverter/charger goes into the prepped loop and powers the outlets the factory chose. It's a good fit if you mostly want to run a TV, charge devices and use small appliances off-grid.
The limit is that you only get the outlets on that circuit. If you later want power everywhere, you'll be redoing the work.
Option 2: Whole-Coach Inverter/Charger
For full off-grid use, we install the inverter/charger between the shore power inlet and the main panel. Every 120V circuit in the RV can then run from the batteries. The inverter/charger also replaces the factory converter as the battery charger.
A whole-coach system uses a larger unit. Which version you need depends on your RV's shore power. Not sure which you have? See 30 Amp vs 50 Amp RV Service: What's the Difference?
| Your RV | Choose | Models |
|---|---|---|
| 30 amp RV (one 120V leg) | 120V version | MultiPlus-II 12/3000/120-50, 120V or MultiPlus-II 12/4000/160-50, 120V |
| 50 amp RV (two 120V legs) | 2x120V version | MultiPlus-II 12/3000/120-50, 2x120V or MultiPlus-II 12/4000/160-50, 2x120V |
The 2x120V models take both legs of a 50 amp service and power both sides of your panel when you're on batteries. The 120V models are for 30 amp RVs and single circuits. The 4000 models add more inverter output and a 160A charger for bigger battery banks.
One caveat on the 2x120V models: no 240V on battery. On battery power, both legs (L1 and L2) are in phase. That gives you 120V on each side of the panel, but no 240V between them. You only get 240V when you're plugged into a 50 amp pedestal, and most generators only put out 120V anyway. This rarely matters, since very few RVs have a 240V appliance or a panel that can feed one. To check, look in your panel. A 240V appliance uses a double breaker: two breakers side by side with their handles tied together.
Any whole-coach system needs a battery bank and DC wiring to match. You still choose what to run: the A/C and other heavy loads need a large battery bank and plenty of charging.
What about RVs without inverter prep? Some installers add a separate subpanel and move circuits into it. We don't recommend that approach. It takes more rewiring than a whole-coach install, and you still end up with only part of the RV on the inverter. If your RV isn't prepped, a whole-coach inverter/charger is usually the better value.
Should You Install It Yourself?
You can, if you're comfortable with 120V AC wiring, high-current DC wiring and fusing. The mistakes covered above are the ones we fix most often: no transfer switch, the converter on the inverted circuit, an oversized inverter on light wire, and undersized fuses or cables. Any of them can drain batteries or cause a fire.
If you're not sure, a qualified RV technician can do it right the first time. We also repair and finish DIY and other-shop installs.
FAQ
Is "inverter ready" the same as "inverter prepped"?
Yes. Manufacturers use both terms for the same factory wiring.
Does inverter prep mean my RV has an inverter?
No. It means the wiring is in place for one. You still need to buy and install the inverter, battery cables and fusing.
Will an inverter-prepped circuit run my microwave or A/C?
Usually not. Most preps cover a few outlets and maybe the TV. Check which outlets are on the prepped circuit. To run the whole RV, you need a whole-coach system.
Can I use any inverter on the prep?
Use one with a transfer switch, sized to the prepped circuit's wire and breaker. An inverter/charger is the best fit for most RVs.
Should I get the 120V or 2x120V version?
Use the 120V version for a factory prep or a 30 amp RV. Use the 2x120V version for a whole-coach install in a 50 amp RV. Our 30 amp vs 50 amp guide explains how to tell which service your RV has.
Will a 2x120V inverter/charger run 240V appliances?
Not on battery. Both legs are in phase when inverting, so there's no 240V. Very few RVs have a 240V appliance. If yours does, its breaker is a double breaker with the two handles tied together.
Do I need lithium batteries?
Not always, but a 2000W inverter can draw close to 200A. Most stock lead-acid batteries can't keep up with that for long. Lithium handles high loads and recharges faster. A Victron inverter/charger works with lead-acid, AGM, gel and lithium, so you can start with what you have and upgrade later.
Do I need a Class T fuse?
Yes, if your lithium bank is larger than 100Ah. Smaller banks still need a properly rated fuse at the battery.
How much does it cost to add an inverter?
It depends on the inverter, batteries and wiring your RV needs. Our Complete RV Power Packages include a Victron inverter, lithium and solar, installed at fixed prices from $6,999 to $24,999. For an inverter-only install, send us your RV details for a quote.
Ready to Add an Inverter?
Our Complete RV Power Packages include a Victron inverter/charger, lithium batteries and solar, installed at fixed prices in Salt Lake City and Fort Collins.
Not sure what your prep covers? Send us your RV's year, make and model, and we'll tell you what it can run and what it needs.